Please Label Your Quilts—here’s how

Even if it’s not your pattern, please sign or label your quilts. There are lots of tutorials on the web. You can buy them too.

A few years ago I began using a light box, called Picture/perfect LED illuminated light box, to make my labels. First, I make the label in Procreate then print. I’ve done it enough that I don’t have to print out my address every time. I just reuse.

Make and Print Label

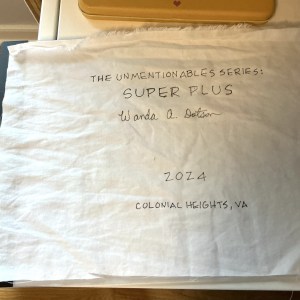
For my latest quilt label, The Unmentionables Series: Super Plus, I printed the title and year, then reused a previous printout.

All those shadows underneath are glue residue from appliqué piecing workshop with Sheila Frampton Cooper.


Place Print on Light Box Then Lay Fabric on Top

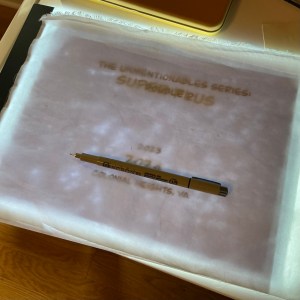
The light box has three settings, but I always use the brightest.


Trace the Letters

I use a Sakura Pigma Micron 05 pen. It’s archival ink. You can also use a pencil if you’re also going to embroider the letters. I do both and the ink is just extra.


Trim

I leave about two inches around the words.
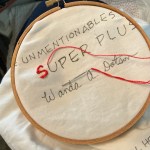
Embroidery—optional


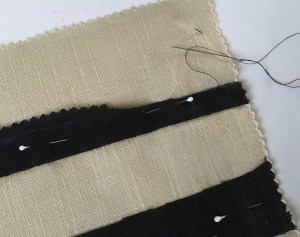
Attach to Your Quilt

Turn the edges over and press about half inch.

Then stitch to the back on the quilt. For this quilt I used red thread to match the label and the quilt. My goal is to make sure it’s tacked down well. This label is 10” x 7.5”. It could have been smaller, but I can add information to it later if I want. Some folks don’t like the background showing through the label, so you could add interfacing or a layer of fabric.

Please sign or label your quilts,

Wanda

Charm Pack Appliqué Quilt and Tutorial

This summer I received a 100 piece Charm Pack of Free Spirit Fabrics’ Denyse Schmidt Modern Solids as a gift from the Central Virginia Modern Quilt Guild. I wanted to use them as a hand project. I wanted simple shapes. I began cutting small straight strips of the next color in the pack and pinned them to an uncut 5” charm. That meant green with green, then green with yellow and green with fuchsia. Sometimes I chose something with more contrast as the mood struck me.

I created a tutorial and a quilt pattern, Hand-Stitched Charm. You can download by clicking here. Also the tutorial can be found at the end of this post.

The photo (right) shows dark green strips appliquéd on a lighter green charm. Denyse has a list of the colors on her website. There are 75 different colors. She has a visual color reference of the color choices on her website as well.

I made 9 patch block as I went along. Sometimes if the strip was large I would cut out the strip from the backside and use it as a strip on the next charm. Without doing that I would not have had enough appliqued charms for the entire 81-block quilt top.

When 9 blocks were finished I would sew them together. To make 81 blocks for a 3 by 3 rows quilt, I knew I would need to use charms without any appliqué strips. It looks like I used 25 of those charms. I made the first row on the top left, then added the one on left below it. That made a row of three 9-patch blocks. Then I followed that with by the row in the middle then the top right row.

I used 80 weight Aurifil thread for the appliqué. I did not trim the charms. That made them harder to sew on the machine and many were not the same size. I trimmed them as close to 5” as possible.

Photos of the backside:

You can see where on the right I trimmed away a cream charm. I used that strip on another charm.

Tutorial

First, pick two charms. Note: these are not DS Modern Solids.

Cut one of the charms into strips.

Attach strips onto other charm with pins. Put aside the other strips to use on another charm.

To begin, mark the strips one-quarter inch from the edge. Chalk or a pencil works.

Thread your needle. About 12-14” long. And add your favorite knot at the end. I use John James Gold ‘n Glide appliqué size 11. You are now ready to needle turn the strips.

Since these are straight, you can turn the quarter inch in with your fingers to start.

Stitch the edges down about every one-eighth of an inch, catching the edge of the strip.

Continue until the end and knot at the end on that strip. Then start on the other side.

Again, here’s the free pattern of Hand-Stitched Charm.

How to Make Perfect Flying Geese or not

Lost in the Elevator

Lost in the Elevator

This quilt took more than a year and a half to make– from design to binding.  I started this quilt to enter the Flying Geese Challenge for last year’s QuiltCon.  (I didn’t make the November 2017 deadline).  I envisioned a quilt with perfectly-made flying geese in sizes from 18″ by 36″ to 1.5″ by 3″.  I used the No-Waste Flying Geese method to make four at a time — you can find the Flying Geese No-Waste tutorial from Patchpieces.com

After making a few of these, I got frustrated with exactness, and my need to make improv blocks took over.   In the end, this quilt represents my approach to design and quilt.  I like the mix of randomness and exactness.  The excitement of not knowing how the pieces will land makes me happy.  Finding a way to make it work together also gives me joy.  The hand quilting also shows my struggle between these competing ideas.  There is a mix of straight stitching and curved chaos.  The quilt finished at 54″ by 54″.

Since I have made a lot of Flying Geese blocks, I made a perfect points tutorial for the Central Virginia Modern Quilt Guild to use for this year’s QuiltCon Charity Challenge.   I’m providing that here– PERFECT POINTS TUTORIAL for flying geese.

Lost in the Elevator Detail View